This page has all the important information you need about how game updates affect resource packs and why that old version warning appears in the first place. We will walk you through two different ways to solve the problem. One of these fixes is so easy that it only takes about ten to fifteen seconds. It is a perfect way to keep enjoying the textures until the creators bring out an official update for the resource pack.
How game updates affect resource packs
Minecraft gets regular updates. This is great because it shows the game is still alive and players still love it. However, updates can sometimes happen very fast. Right after a major release, Mojang usually drops a few small patches over the next week or two to fix bugs. These small patches do not change much in the game, but they do change the version number. That version number is exactly what triggers the warning about a pack being made for an older version. For a resource pack to perfectly work without any warnings, its version number needs to be the exact same as your Minecraft client.
We also need to remember that resource pack creators have personal lives. They cannot watch Minecraft updates all day and night. If a huge game update adds new items and blocks, creating new textures takes a lot of hard work and time. Depending on the style and detail, a resource pack update might take days, weeks or even months to finally come out.
Why the game says your pack is old (or new)
Most of the time, an older resource pack will still work just fine on newer Minecraft versions. The only annoying part is the red warning message you get when you try to load it. The game will tell you that the texture pack was created for an older version. This is not actually a bad thing. Mojang added this feature simply to let players know about the version difference.
They likely added this to stop getting so many false bug reports. If you use a really old pack that missed important technical changes, it can cause weird visual glitches in your menus or even crash your game completely. That is not a bug Mojang can fix. The warning is just there to let you decide what to do next. You can try the pack anyway to see if it still works, wait for the pack creator to release an update, or go look for a completely different pack.
How to get your pack working
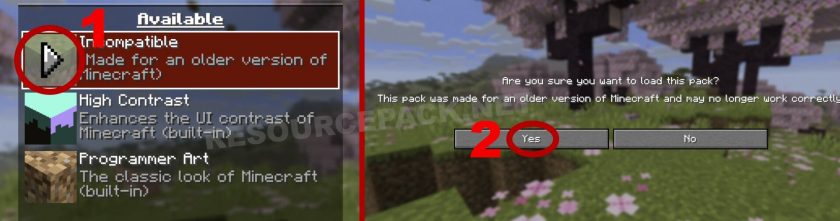
➤ The fastest way:
There are two ways to get around this error. Just keep in mind that neither method will magically create missing textures for you. You can continue using your pack without any issues. However, if the latest Minecraft update added new blocks or items, those specific things will just show up with the vanilla/default Minecraft textures instead.
➤ The advanced fix for perfectionists:
The first method is definitely the easiest way to handle this. It is fast and rarely causes any major problems in your game. However, many players just hate seeing that red warning text in their resource pack menu. We completely understand wanting your game to look clean and perfect. Here is a guide on how to make that warning disappear. Just keep in mind that this method takes a little more effort. You will need two basic things to do this. You need a simple text editor and a program that can open zip files. If you are using Windows 10 or Windows 11, you already have everything you need. You can use Notepad to edit the text and the default Windows extractor to open the zip archive. You do not need to download anything extra. If you are on an older version of Windows, you might need to download a free program like 7-Zip or WinRAR. Mac users also have everything ready to go. You can use TextEdit to edit the text and Archive Utility to open the .zip pack. You will not need to install any extra software.
Now that you know what tools to use, let us move on to the actual steps.
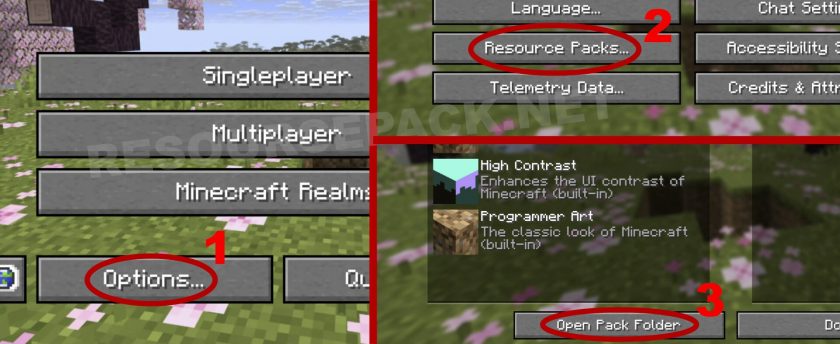
Step 1: First, launch Minecraft, go to Options, then click on Resource Packs. At the bottom of that screen, click the Open Pack Folder button. This opens the exact folder on your computer where all your active and inactive resource packs live.
Next, find the .zip archive file of the resource pack you want to fix. Copy that file and paste it right onto your desktop for easy access. On Windows, right click the file and choose Extract All. If you use a Mac, simply double click it or right click and choose Open. This extracts all the contents into a brand new folder on your desktop.
Step 2: Open up that new folder on your desktop. Inside, every resource pack has a file named pack.mcmeta. This is a very small text file containing basic data about the pack. Texture pack will not work correctly without it. Open this pack.mcmeta file with any basic text editor like Notepad or TextEdit.
Inside the file, you will see a few lines that say pack_format, min_format, and max_format. These represent the version numbers we talked about earlier. This is exactly what you need to change.
To make things super easy, you can simply copy and paste the JSON text below. Open your pack.mcmeta file, delete everything currently inside it, and paste this new text, save.
{
  "pack": {
    "pack_format": 69,
    "min_format": 69,
    "max_format": 999,
    "description": "ResourcePack.net Guide"
  }
}
You can also change the description text “ResourcePack.net Guide” to whatever you want, like the actual name of your pack. Just make sure you do not delete the quotation marks around the text.
If you want to know what all these numbers and words actually mean, we have you covered. If you do not care about how it works, you can scroll right down to Step 3, which is the final step.
- pack_format tells the game exactly which Minecraft version the resource pack is built for.
- min_format is a newer setting that marks the oldest game version a pack supports.
- max_format works just like the minimum setting, but it marks the newest game version the pack supports.
Just in case you will want to make manual custom changes, here are the corresponding pack_format numbers for each Minecraft version:
- 1 for versions 1.6.1 to 1.8.9
- 2 for versions 1.9 to 1.10.2
- 3 for versions 1.11 to 1.12.2
- 4 for versions 1.13 to 1.14.4
- 5 for versions 1.15 to 1.16.1
- 6 for versions 1.16.2 to 1.16.5
- 7 for versions 1.17 to 1.17.1
- 8 for versions 1.18 to 1.18.2
- 9 for versions 1.19 to 1.19.2
- 12 for version 1.19.3
- 13 for version 1.19.4
- 15 for versions 1.20 to 1.20.1
- 18 for version 1.20.2
- 22 for versions 1.20.3 to 1.20.4
- 32 for versions 1.20.5 to 1.20.6
- 34 for versions 1.21 to 1.21.1
- 42 for versions 1.21.2 to 1.21.3
- 46 for version 1.21.4
- 55 for version 1.21.5
- 63 for version 1.21.6
- 64 for versions 1.21.7 to 1.21.8
- 69 for versions 1.21.9 to 1.21.10
- 75 for version 1.21.11
- 84 for versions 26.1 to 26.1.2
A full list with all the newest updates and snapshot versions is available here.
Step 3: You are almost done. Now you just need to put everything back into a zip archive. Open the folder where you just edited the pack.mcmeta file. Highlight and select every single file inside this folder, making sure you include the pack.mcmeta file too.
Next, right click on those selected files. If you are on Windows, choose Compress to and select ZIP file. If you are using a Mac, just right click and choose Compress.
That is it. Copy this brand new zip archive and paste it back into your resourcepacks folder. You are officially done. When you launch the game and open the Resource Packs menu, you will see that the red warning has completely disappeared.
Leave a reply
0 comments
If your comments are consistently being deleted, please be sure to review our Comment Policy.